Well, there is something to be said for my OCD...I usually don't rest until I get whatever I am working on right. This included my making of French Macarons. Out of the 4 batches Cody and I made Wednesday evening, only 50% of those cookies turned out remotely looking like they should. Soooooo.....I came home after Thanksgiving dinner last night and did more research. I learned some things that I am going to be sharing with those of you who wish to make these as well!
 |
| Today I made Blackberry Macarons. |
As I felt that there would be no recipes for blackberry macs (I have chosen to shorten the word Macaron as I am rather lazy when it comes to writing....) so I googled raspberry macs and found this recipe...
I used the recipe for the cookies that I used for the Pumpkin Macs but omitted the pumpkin spice for these.
 |
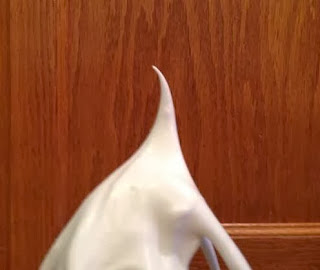
| See that peak on the top of the meringue? It is slightly bent over...this is not what you want... |
 |
| Take the whisk attachment off of the Kitchenaid or whatever you are using, and use it to stir the meringue...then dip it straight up and down into the meringue and pull it out... |
 |
| If your meringue looks like this, with the peak straight up and down, your meringue is ready!! |
For these, I chose to dye the batter purple, totally forgetting that blackberries are not actually purple but a bright red...grrrrrr...actually the end product turned out ok as the contrast between the cookie and filling was quite lovely!
After you have folded your almond/sugar mixture into the mirangue and the batter falls smoothly off your spatula in a nice uninterrupted ribbon, spoon a little dallop of the batter onto a plate. If it stays "puffy" like above and does not spread a bit, you need to fold it a little more. (I learned this little trick from Katherine from The Fashionble Past...)
After a few more folds, re-spoon a dallop of batter. If it spreads out a bit like above, it is time to fill your pastry bag and start piping!!!
To avoid leakage while filling your pastry bag, twist the bag where it meets the tip and tuck it down into the tip. This helped greatly.
My handy assistant from Wednesday was not around to hold my bag while I filled it today, so I improvised and stuck it in one of my tall glasses...excellent hands free holding!
I had my son use his compass to draw me some circles on a sheet of parchment. They are a little over 1" in diameter. I used this as a guide under the parchment. Both of the videos I watched on making these cookies suggested this and let me tell you it helped!!! The knives are there to hold down the parchment that is over the guide, it tends to curl.
Ok, a tip on the "resting" time. See above how shiny the batter is? These are freshly piped macs.
After resting 45 minutes (at my house...remember, different places will have different temps and humidity), the macs are now matte, not glossy. It is time to put them in the oven!
I poked the side of one of the macs to show you how crusty the top of the cookie needs to be. (Another tip from Stephanie of The Joy of Cooking!)
Huzzah! Here we have a full tray of non cracked macs!!! See those lovely legs! This is what I so wanted to see! I literally sat on the floor in front of the oven watching the cookies to make sure they didn't crack!
I discovered something today. The first batch, I put two sheets of macs in the oven. The macs from the top rack ended up not cooking totally on the bottom and ended up looking like the mac on the right. The mac on the left was on the cookie sheet on the bottom rack. This is what the mac needs to look like. Note to self...one sheet of macs in the oven at a time!!!
Another thing I learned...the top cookie sheet produced a browned mac like the one on the right. The one on the left was from the cookie sheet on the bottom rack of the oven. The next batch, I only used one cookie sheet on the bottom rack and put an empty cookie sheet on the rack above. For some reason, it protected the macs on the bottom from browning...most interesting. I will be doing that from now on!
I hope my hints will help any of you who decide to make these fabulous macarons!!
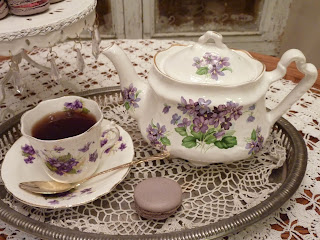
Time for tea and macarons!
Blessings!
g


Those look wonderful! I want that tea set too! I love macarons! I had an amazing blueberry and earl grey one, rosewater is great too, although pistachio is always my favourite of everything! I have not had blackberry ones and want some now! That process looks hard though, and with my crummy oven, it is not going to happen. Perhaps I can pass on the tips to my boyfriend's mother if she makes macarons sometime.
ReplyDeleteHello Laura!
DeleteThank you! I really love my tea set. A while ago, I had a Violet love affair and so purchased quite a lot of Violet everything! The macarons you tried sound very delicious! Especially the pistachio one...I love pistachio ice cream! The process is not that hard, just time consuming. It took me four tries before I got the hang of it. We will see if that lasts! I hope your boyfriend's Mother can make some of these! They are so awesome!!
Blessings!
g
Ah, they look gorgeous on a photo! And you have a beautiful tea-service :) The posts made me want so badly to try baking my own macaroons, and I will :)
ReplyDeleteHello Porcelana!
DeleteYeah! I am so happy to hear that you are going to try making these! They truly are not that hard. A lot like sewing is how I look at making them. At first it is not that easy, but the more you try it the better you become! I hope to see that you have made some in the future!
Blessings!
g
Ah, such wonderful photos! I love them! :)
ReplyDeleteHello Gabrielle!
DeleteThank you so much for your lovely compliment!
Blessings!
g
Lovely! But what did you fill them with? I took a class recently on making macs but haven't had time to try.
ReplyDeleteI have that tea set too.
Val
Hi Val!
DeleteI filled these with a blackberry buttercream...butter, powdered sugar and blackberries that had been run through a sieve. It was really yummy! I would have loved to have taken a class on how to make these! But, I am happy that I was able to figure them out on my "own"...with lots of internet and Katherine help! I just love my violet set! I actually have many sets of violets as I collected all things violet at one time! Don't you just love violets? In the spring, I plan on making violet macs!!!
Blessings!
g
Really lovely photos. They look straight out of a cooking magazine! Not to mention your macaroons, which also look amazing. Clearly all your homework paid off. I hope you feel quite successful!
ReplyDeleteBest,
Quinn
Hello Quinn!
DeleteYou have no idea how successful I felt watching the macs rise without cracking! I ran downstairs shouting to my husband how lovely they were....I think he knew at that moment just how crazy I truly am!!! Thank you for your lovely compliments on the photos! I do love dressing things up!
Blessings!
g
Oh Gina, did you have to make them look so delicous? Now I'll HAVE to give them a try! Especially after visiting the shop I wrote about before - now I'm broke, haha, but it was worth it - I tried a coconut one and wild strawberries one this time. Now I'll just have to decide the flavour, buy the ingredients and check out the videos you posted previously.
ReplyDeleteYeah!!!!! I truly hope you do make some! Now you can make a dozen of these little delicacies for the price of one from the shop! And all different flavors too! Tonight I'm making chocolate ones! I want to make strawberry ones too...I am pretty sure they will taste fabulous! I hope you get as much help from the videos as I did! Please let me know how your macaron adventure is for you!! I would love to see your yummy creations!!
DeleteBlessings!
g