To all who mourn in Israel, He will give a crown of beauty for ashes, a joyous blessing instead of mourning, festive praise instead of despair. In their righteousness, they will be like great oaks that the LORD has planted for his own glory. Isaiah 61:3
Showing posts with label 1950s. Show all posts

Tuesday, December 22, 2015

Christmas Card #2, A Swing Coat, and Mrs. Claus!


Right then! Today was a "there is nothing going and nowhere I need to be" day, so I took advantage of the nothingness of the day and asked my sons if they would do a photo shoot with their old Mom.  They said they would and the following photos are the result of that agreement!  I do apologize for the exposure of the images however.  A lovely man at The Bishops' House fixed Mom's camera so that more light would be let in during inside shoots, and we of course have totally forgotten how to make it go back to how it was before.  Major editing on Picasa was used to get me to look like I hadn't just seen the back of God's head (think Moses on the top of Mount Sanai...)

Anyhoo, here they are!  I am so loving the versatility of all of these pieces that I made for this project as there are so many different outfits that can be worn and I'm not even done with all the pieces!  Huzzah!!!

Christmas Card #2


Thankfully I had a little Christmas tree that I was able to decorate like the lovely one on the card.   I used all vintage ornaments that had belonged to my Grandparents and Greg's Grandparents when they decorated their trees in the 1950s!  What fun!


Source:  Etsy


Another shot of the front of the blouse.  I used Butterick 4826 for the blouse and Vogue 8687 for the skirt.  The skirt was a pain.  There I said it.  It is actually on backward as the front of the skirt has about 10 darts that cause the waist to fit into the waist band.  A really great idea....on paper.  When I got it all sewn together and the zipper inserted, I tried it on and....HAHAHAHAHAHAHAHA!!!!  Those fabulous little pleats that were supposed to look so good (cause it does on the drawing on the front of the pattern) looked ridiculous on me.  Maybe if I were 4 months pregnant, it would have looked fine, but I'm not. I was totally disgusted and despondent when I happened across this image from Tuppence Ha'penny Vintage!  Thank you Lord!!!  There was a pleat in the front of the bottom middle skirt!  There was a pleat in the back of my skirt and when I twisted it around to the front, it looked exactly like the one from the catalog!!!  Hot Dog!!  So, I am wearing my skirt backward and all is well with the world!!


Vintage Swing Coat Look
(With newly made pillbox hat!)

Another look I get from the separates is this way fun swing coat look.  Not sure if that is a proper term, but I am using it.  I LOVE LOVE LOVE this coat and am so happy that it did not become an Edwardian toque, muff and stole!!  I searched Pinterest for some fun Vintage advertisement and magazine poses that the models struck and so that is why I look like I do in the images below!  Hahahahaha!!  The people driving by in my neighborhood kept slowing down and waving.  I'm sure they didn't know what was going on!


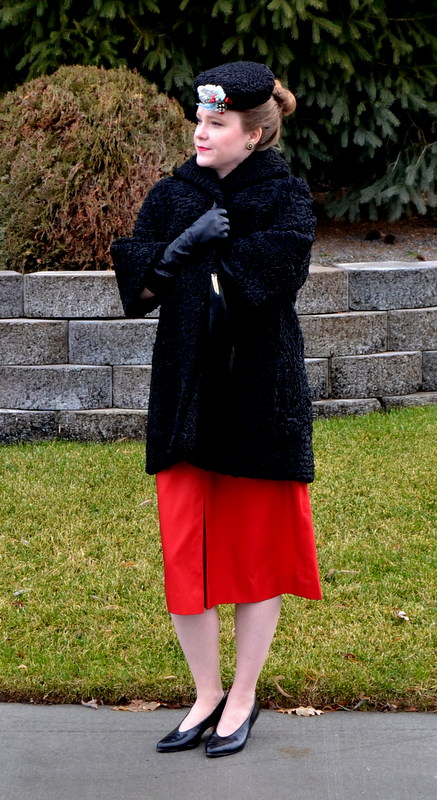
This pose was inspired by this pose.  As was the hair.  I was thinking of how I could do a quick hair do when I came across the image of the lovely lady in the latte colored coat and red hat.  It appeared as though her hair was pulled back in a bun, just like the Christmas Card girl!!  Huzzah!  I can so do a bun!!!!


Mrs. Claus

While I was trying on the pencil skirt with the blouse, I added the black belt I made for the Christmas Card outfit and much to my delight, I realized that the outfit made a perfect Mrs. Claus outfit!!  What fun! I borrowed the Santa hat from my youngest.  I ran upstairs to get some gloves saying, "Santa wears black gloves right?"  Colton yelled back, "No!  He wears white gloves!"  White gloves it was!  The Christmas stocking is a vintage one I found years ago at a thrift store!


Another silly 1950s pose.  Love 'em!

Well dear friends, I am afraid that's all that I am going to get done before the New Year.  The Coat and bolero will have to wait until next year.  I have put away the sewing machine, the ironing board, the iron, the fabrics and the patterns.  I have vacuumed the floor and tidied up the sewing space in my room.  I hope that you all have a very Merry Christmas!  I pray for peace, joy, contentment and for you to feel the happiness that this season brings!!


Luke 2:8-14

And in the same region there were shepherds out in the field, keeping watch over their flock by night.  An angel of the Lord appeared to them, and the glory of the Lord shone around them, and they were filled with great fear.  And the angel said to them, "Fear not, for behold, I bring you good news of great joy that will be for all the people.  For unto you is born this day in the city of David a Savior, who is Christ the Lord.  And this will be a sign for you:  you will find a baby wrapped in swaddling cloths and lying in a manger."  And suddenly there was with the angel a multitude of heavenly host praising God and saying,

"Glory to God in the highest, and on earth peace, good will towards men!"


Love and blessings to you all from me!!!

g

Monday, December 21, 2015

1950s Pillbox Hat Tutorial!


Ok!  It's tutorial time!  Huzzah and away!

For the 1950s Christmas Card #1 dress, I made an ermine hat to go with the ensemble. I was in such a rush that I only had time to take pictures of the buckram being cut out!  I told myself that next time I made a fur pillbox hat I would take pictures and write a tutorial.  Then, Miss Lily of Mode de Lis asked if I had any tips or tricks for making one, so this blog post is for you Lily!  And anyone else who would like to know how I made my fur pillbox hat!  Let's get started shall we?

I have been plodding along at my 1950s Christmas Separates and have only the coat and bolero to complete!  I will be doing a photo shoot with the pencil skirt and black blouse (Christmas Card #2) and the red tank top blouse that will also be worn with the pencil skirt.  Years ago, at a local thrift store, I purchased a vintage, 1950s, black curly lamb swing coat for $10.00.  I had in mind that I would disassemble it and make an Edwardian toque, large muff and stole.  Well, that never happened and I am beyond THRILLED that I didn't!  Becaaauuuusssse....I can wear it with my new found love of the '50s!  Well, because I have a swing coat, I "needed" a hat to go with it so I could do a super fun photo shoot with my new wardrobe!  Enter the creating of a new hat!

Below is one of the inspirations for the hat I envisioned with the ensemble.  Another one can be found on a Christmas Card from The Glamorous Housewife.


Found on eBay.

So let's get down to the nitty gritty!!!


1.  Cut out crown from buckram.

The first pillbox I made was a bit larger than this one, but you can totally use the same techniques for any size fur hat.  I wanted this pillbox to be smaller than the ermine, (I actually have a vintage hat that is exactly this size, so I know it is era correct) and a saucer from my cupboard was the perfect size!!  The plate is a 6" wide one.  I traced around the plate then cut the buckram out.


2.  Sew the wire around the outer edge of the crown using a zigzag stitch.


3.  Figure out the length of the crown side buckram strip.

For this, since I am not using a pattern, I just cut out a long strip of 1.5" wide buckram.  I snugged it around the edge of the crown tip and overlapped the ends about 1".


It ended up being 22.5"


4.  Sew wire to one edge of the crown side strip, allowing for about 1" of wire to extend on both ends.  

"Cheat" Tip:  I like to sew holes on the opposite end of the wire with a non-threaded needle to aid in the sewing of the crown side to the crown top!


5.  Connect the ends of the crown side, overlapping to the correct circumference of the crown tip.

"Cheat" Tip:  For my own hats, I totally staple the ends of the crown sides!  You can leave the staples in, or just use them to hold the ends together while you  hand stitch the ends together.


Now here is where the those extended wire bits come into play.  For added security, I sew the wire ends to the wire on the edge with the left over thread.  That means it will stay!!!


Hopefully you can see what I was talking about here...my pinky and index finger are pointing the spots out.


6:  Sew crown side to crown top.


7:  If you haven't already done so, deconstruct your vintage fur coat.  

The vintage rabbit coat I used for the ermine hat took me about 1 hour to deconstruct.  The people who make them want to make sure the coat NEVER FALLS APART!!!

8:  Cut out your fur.

For mine, I put the saucer down on the back side of the fur.  I added 1" all away around the saucer so that the fur would extend a good ways over the sides.

*NOTE:  for all the cutting out of the fur, any fur, always cut out from the back side of the fur.  I like to use an Xacto knife*


Again, use an Xacto knife and make very shallow cuts.  Furs, especially antique or vintage ones can be delicate, so cut with care.  You don't want to cut off the actual fur, or pile.  Shallow cuts will make sure the fur on the fur side will be there!  And will cut down on all the fur fluff floating around and potentially getting up your nose!


For the crown side fur strip, I cut out a 3" by 24" strip.


9:  Cut out any batting or mull that you feel you need.

For this hat, I just used 1/2" batting, using the saucer for a template.  This adds an extra little "puff" to the top of the hat so it isn't so flat.  There really isn't any need for mull (I use flannel) as the fur is super fluffy and thicker than silk, cotton or velvet so you don't need it to smooth out any lumps or bumps!


10:  Put batting and crown tip fur on crown tip and pin it in place.

I like to anchor my crown tips down with plain old sewing pins!  You can see them as the yellow dots in the picture.  Space them out about every 1.5 to 2".  For this fur hat, you don't have to keep the fur super tight and perfect as it's fur and any wrinkles or bumps will totally be hidden!  You really can't mess these up.  I just doubled up plain old ordinary sewing thread for every aspect of this hat.


11:  Stitch crown side to hat.

For this hat I had to fold over one of the short ends of the fur to make a nice edge.  If you are using rabbit fur or a "long" fur, I would strongly suggest cutting the fur so that the pile runs left to right.  this way the fur will look nice going horizontal.  If you do this, use the edge that the fur hangs over the edge for the starting side.  In other words, you want to place the edge that the fur hangs over down first, so that when you fold the crown side down, you have a nice, "continuous" looking side!  there will be no hint of where the fur starts and where it ends.


I like to pin the fur to the hat using my sewing pins.  Place the fur about 1/2" from the top edge of the crown tip.


Where you see my stitch is exactly the edge of the crown tip and crown side.  For this hat, you can go ahead and make your stitches bigger!


What the hat looks like before I pulled the crown side down.


12:  Pull the crown sides down and secure with pins.

Now be very careful as you pull the crown sides down.  The fur I used for this hat was quite delicate as the leather was a wee bit dry and started tearing in places.


Again, pins are lovely to keep the fur in place as it does like to shift while you are sewing.


Fur all sewn in place!!


13:  Cut out lining.

For my lining, I considered using the original coat's lining but it was starting to shatter, so instead opted for some thin taffeta out of my stash.  

I used the saucer again for a template, extending the line 5/8".  DO NOT cut out the crown tip lining the exact same size as the crown tip (in this case the saucer) as it will not look right.


Fold the circle in quarters and mark at every crease.  This will aid in attaching the lining sides to the top.


For the lining sides, I cut out the taffeta 3" x 25".  Because there is no pattern, I pinned the lining sides to the inside of the hat...


Where they met on the inside, I joined the edges together and marked where it sat snug together, then marked with chalk.


Where I marked with chalk is the inside seam.  Press open.


For the lining up marks, use the back seam for the starting point and make three other marks for a total of 4 marks.


Match up the marks and ease in any extra fabric from the crown tip.  I had a little bit.


14:  Sew lining crown tip to crown side.


Just a picture to show how the crown tip needs to be eased into the sides.


I used 5/8" seam allowance for the seam.  Then I cut the seam to about 1/4" to get rid of the bulk.


15:  Pin lining to hat.

I actually had a lot of fabric, width wise in the lining, so I cut the sides about 5/8" shorter, then folded the edges over another 5/8".  You can see in the above picture the trimmed seam...


Beginning at the back, start pinning the lining to the hat placing the edge of the lining about 1/4" down from the bottom of the edge of the hat.


16:  Sew the lining to the hat!!

I used a whip stitch to attach the lining to the hat, making sure that I got a bit of the leather of the fur and not just the curly fur.  Just getting the fur would not have held the lining in very well in this hat and it wouldn't have held it in at all with the rabbit fur!


Lining all sewn in!


17:  Make securing loops.

I haven't made any yet as I don't have any black embroidery floss, but when I do make some, I will probably place two securing loops at the place where the lining meets the wool in either side of the hat.  These will be used to attach the hat to my hair with bobby pins or small combs, like one of my vintage hats employs.

18:  Decorate!!!

For this hat, I chose a vintage Christmas corsage that I have pinned on. I don't want to actually sew anything onto it as this hat can be used for many different seasons, not just Christmas!!!

*For the ermine tails on the other hat, I simple cut slits in the rabbit fur and slid the ermine tails into the fur, then glued them in.*

And......DONE!!!


Hat on my head so you can actually see the size of it (I have a way bigger head than the mannequin does!  hahahahaha!!!) even though I am decidedly not sporting a 1950s hair do!!

Ok!  That's it!  Easy Peasy!  I hope that this tutorial helps when considering making your own 1950s Pillbox hat!!

Be Blessed my friends!

g