To all who mourn in Israel, He will give a crown of beauty for ashes, a joyous blessing instead of mourning, festive praise instead of despair. In their righteousness, they will be like great oaks that the LORD has planted for his own glory. Isaiah 61:3
Showing posts with label accessories. Show all posts

Saturday, April 16, 2016

Reproduction Orange Blossom Headpiece and Wedding Bouquet


These past few days have found me waiting for corset steel to get here so I can start on a wedding corset.  I have not, however, been idle while awaiting my package...I have been working on the waxed orange blossom items for the wedding trousseau!  It has been a nice "sit down" project to do as I have been recovering from allergies-turned horrid cold.  A lot of cutting, taping, wrapping, painting and dipping in bees wax took place.  I ended up using all but 3 of the orange blossoms that I recently wrote about, in the bouquet that was made a few days ago. I had to make more blossoms, pips, and I decided to go ahead and make some leaves.  This time around, I did the blossoms a wee bit different.  Instead of painting the insides (pistil) of the flowers a pale yellow, I left them white with a pale green tip.  I really, really love how these new ones turned out.  They are much less yellow than the original ones!  I made enough for the headpiece, flowers for the bodice of my dress, boutonniere for Greg and a corsage for my sweet Mama!  I also decided to purchase some larger round balls to wax because the inspiration headpiece had things that resembled them... 

The Headpiece!

I had been looking at many headpieces both online and studying the photographs in my collection when I came across this fabulous headpiece (click on the image to take you to Ruby Lane for all the views).  I loved the shape and the fact that flowers, buds, small and large pips and leaves were used.  I also liked the lighter color of green.  This prompted me to make some lighter green leaves. 


The veil is just my silk tulle added for that bridal look.


Oh yes...these flowers are much better!


It's interesting that the people who made the Victorian ones used paper and wire to hold the headpiece together.  They weigh much less than mine which uses florist's tape and heavier wire.


I wish there was a way to make them smell like real orange blossoms, one of my favorite fragrances.  These smell like bees wax!


If you look real close, you can see that I did cover the florist's tape with thick cotton thread.  Not only does it look a wee bit more "authentic" this way, it keeps the tape from sticking to my hair!  Hahahahahahaha!!!


More Inspiration

The following photographs are from eBay.  The 1890s brides' headpieces are very similar to mine.  I plan on making the veil have the puffs and fluffs like theirs. The bouquets are also inspiration for mine.  They are a tight nosegay surrounded with either lace or doily trim. 


The Bouquet

I wanted to make sure that the bouquet worked well for the year of my dress which will be 1897ish.  Happily I found the above images that helped me quite a bit.  I looked for doilies that could possibly work, but none of them made me happy.  I found some beautiful and doily looking antique lace in my stash and so used that.  I spent the better part of an hour making the poster board bouquet holder to put the flowers in.   Two bouquets with paper holders can be found Here and Here.  (Again, click on the image and it will lead you to Ruby Lane where more images can be seen.)  Both of these bouquets have paper doily like trim.  Another one from The Museum of Fine Arts, Boston sports a paper holder.  I used this one for inspiration for the wrapping of the flower stems


My bouquet has waxed orange blossoms, buds, pips, waxed vintage lily of the valley and silk ranunculus that I found at Gordman's.  


Paper holder and ribbon wrapped stems.


One of the photographs above shows one of the bouquets with a long looped bow, so I made one for my bouquet.


 Below is an antique bouquet found on eBay.  This one has the paper holder but with real lace and not paper.  I wonder if the lace would have been starched?


This one has the wires from the flowers merely tied with a silk bow.


Now I just need the dress, and the corset, and the corset cover and the chemise and the drawers.  I have two beautiful extant petticoats that I will be wearing to finish off the underwear.


Now to continue waiting for the steel to get here.  I purchased some vintage ivory fabric at an antique store last week for the corset.  It is very lovely and I think will make a beautiful corset!

I hope you have a most fabulous weekend my friends!

Be Blessed!

g

Wednesday, December 3, 2014

A Victorian Kashmir Paisley Shawl

Ok, so I know that I was going to start posting TBT posts on past dresses of mine...but something happened yesterday that I have to share with you!  As costumers, I think you will appreciate the excitement that is coursing through my veins at present.

Since I started veering away from my almost strict adherence to only making NFE to 1820s dresses last year, (had to make 1863 dresses for the 150th anniversary of the Idaho Territory), I have been oogling the enormous kashmir paisley shawls of the early Victorian Era.  The colors, the intricate designs, the lovely black part in the middle of the shawl (why is that there?) and the fringe-y bits at the ends.  I pinned pins to my 1860s boards and even went so far as to search for them on eBay and Etsy.  Holy Monkey those babies are expensive!  Well, of course, they are oooooold and probably not many survived.  Right?  I was totally ok with not ever owning one.  I have other accessories that I can use with my early Victorian wardrobe anyways.

Then yesterday happened.  I had some time to kill in between having a lunch date with my husband and picking the boys up from school.  Where do I go when I want to spend time in lust, drool over things that are old, and bemoan the fact that I am not a millionaire?  That's right.  Antique World Mall.  It truly is a place of wonder and awe to me.  Just to be with things that are from another time delights my heart to no end.  I was running out of booths to peruse when my eye caught a little slip of fabric peeking out of a large wicker washing basket.  I took a step closer as my brain started to recognize what my eyes were telling it it was seeing.  Could it be?  No.... I live in Idaho...not on the East Coast where fabulous things like this reside for corn sakes!  I gingerly grasped the edge of the cloth and slowly and carefuly started to disentangle it from the quilts and blankets that were piled atop it.  As more and more of the cloth came to light, my heart started to flutter and my eyes dialated (this happens a lot in antiques and fabric stores, just in case you haven't noticed...).  I caught the whole bundle up in my hands, purse, phone, and beanie babies forgotten on the floor.  I moved to where I could spread its HUGE length out fully on the floor and began to open the whole glorious mess up.

I was literally BUZZING with excitement, wanting to laugh and giggle and burst with joy at my discovery!!  One of the owners of the mall came by and helped me to spread out the shawl.  He looked at it and said, "Huh.  Well, that's neat."  My eyebrows raised to my hair line and I studdered...."Yes.  Yes it it."  Thinking to myself, "Don't you know WHAT this is???!!!"

Then....I looked at the price tag thinking to myself, well at least I got to hold it and drool on it.  Hope the person who buys it doesn't mind the water damage.

.............

Imagine if you will, a warm 2 liter bottle of Coke that someone has inserted a Mentos into, replaced the cap and shaken up for all their might.  Now imagine all that energy is trying to escape.

That was me at that moment!!!!

OH MY GIDDY AUNT!!!!!!  

On the price tag was written....."Vintage fabric remnant $18.00"

$18.00!!!!!!!!!

Have you ever tried to keep from bursting out with great braying guffaws and crazed laughter?  Well, I must say that I was exceedingly proud of myself.  I made it to my car, shawl carefully in hand before the crazed, lunacidal maniacatic laughing began in earnest.  I think I made myself light headed from sheer giddiness.

I came home and as is my style, totally geeked out on Victorian Kashmir Paisley Shawls.  I have made a new Pinterest board you can see here.  I also did a bit of research and will be sharing that with you below.

I not only found some fabulous images of extant shawls, I also have found some beautiful paintings of ladies wearing these shawls!  Laaaaaaaa!!!!!


"In Memorium" by Alfred Stevens, 1861. Source
I LOVE this painting as it shows both my beloved mourning dresses, but also the shawl being worn by one of the ladies in mourning!!  A match made in my costuming heaven!


Fanny Holman Hunt painted by William Holman Hunt Art Blog

Wholesale Scarves has a very well written history on the Kashmir shawl craze that swept the fashion world from the early Regency Era to the mid Victorian Era.


Another delightful painting by Alfred Stevens, "Will You Go Out With Me Fido?"

Now here is my beauty!!!  It measures a whopping 60" x 129".  It is colossal and so fun!  There are a few slits in it where the shawl has slit.  Someone in the past carefully mended it and this morning I mended the rest.  I wish the colors would translate better than what I have here...


I tried to spread it out in my bedroom, but it was just too big.


On the family room floor...it's longer than the huge rug!!  I find the segrated "box" looking things at the ends interesting.  Need to research what those were for.  Just some pretty way to finish the ends?


The colors of this shawl are so very interesting.  When you look at them up close and personal, they are really not that pretty, almost, dare I say, ugly.  But taken as a whole, the colors working with the design, are a true thing of beauty!


The black silk at the center has some spots that are getting a bit thread bare.  This will be used as a costuming accessory very carefully and not very often.


 Close up of the weave.  So very small!


Back side of the shawl....I wish I knew about the lady that owned this shawl!  In my imagination, it was brought back to the states by a loving husband to his beautiful wife.  He had been on a business trip to England and this caught his eye while he passed the window of a dry goods shop.  With his wife in mind, he purchased this and knew it would look lovely with the sapphire blue silk dress he also purchased for her.  Yes, I am that sickly romantic minded....Don't judge.

Here is some more history on the Kashmir Paisley Shawl:


Well, that is it for my excitment!!  I do believe my new shawl will pair nicely with the 1840s wool mourning dress I have in the planning stage!  I sooooooooo cannot wait to get that dress done so I can play dress up!!

Be blessed my friends!

g

*Now back to our regularly scheduled TBT*

Thursday, November 13, 2014

Autumn in Cranford: The Accessories

Accessories

"Friends don't leave friends leave the house without accessories"

"I've always thought of accessories as the exclamation point of a woman's outfit"  Michael Kors

I love the accessories that go along with costuming.  It is my firm belief that when you decorate your outfits with accessores that fit the era of the outfit, it goes that much further to help your outfit look authentic and like you just stepped out of a fashion plate.  It also helps feed my OCD and "Shiny" Magpie issues...this could be a good thing or a bad thing.  

Anyhoo, I thought I'd share the accessories that I have chosen to decorate my Autumn in Cranford Dress with!

Pelerine

 Pelerines of lace and fine linen or cotton were worn over the day dresses in the Romantic era...a few examples can be found herehere, and here.

I am still debating on what I should wear at the top of my dress.  The fabulous lace pelerine that I found on eBay or the one that I made...the jury is still out...


I just love the way this lace one covers the wide shoulders!


Pretty, pretty lace!


Shawl

There are several instances I have found where a beautiful shawl, more than likely a carry over from Regency days, was worn on a cool day.  I found three lovely examples... one in a painting, one in a fashion plate, (top image of lady in black dress) and an extant example!! 

I followed the directions on to make a long shawl out of two smaller ones from Jen of Festive Attyre.  Her Regency Shawl Hack tutorial came in quite handy!  I found my shawls on eBay from this store.  They were thinner than I had assumed, but that's ok.  The two shawls went together quite nicely, but if you intend to do this, just be warned that my shawls were very slippery and took a lot of pins to keep them together while sewing.


Lovely jewel tone colors!


Works perfectly with the dress!!

Mitts

Another thing I noticed while researching the 1830s was that mitts were worn as well as gloves.  Some lovely examples can be found here, here, and here.

Kaila from Tea Cups and Frocks wore a pair of the most dainty mitts at Costume College and I about drooled all over them when I saw them!  She was kind enough to direct me to where she purchased them... Laci's.  They are made of silk and are hand knotted and are so fabulous!!!


Sadly when I wear them with my dress, you don't see very much of them!!


Reticule

For the requisite reticule, I will be resurrecting the one I made for my Elizabeth Bennet outfit I wore to Coco...Yay for things already on hand!!!


Boots!!

Ok, so I have been biding my time, waiting and waiting.  Finally the day came!  My birthday.  I told all who asked "What do you want for your birthday" that I would like funds to be pooled so I could purchase boots from American Duchess.  I was seriously ecstatic when I was able to order the Gettysburg Side Lace Boots!!!!  Then I was even more ecstatic when they finally arrived on my doorstep!  I think my mailman feared for his hand as I almost literally ripped the box from his grasp!  Ok, nooooooo, I didn't really rip them from his grasp... but I know that he knew I was serious about getting them inside!  THEN!!!  My son had the gaul to ask me if he could open the box!  Is he insane!!??????  Pft!!  No way son!   This is MY box that holds MY boots!  Get back!!  I rushed upstairs and calmly and gently opened the box that held the most fabulous pair of boots I have ever owned!!!!

And yes, I took pictures at each step!!  I am that geek.


Pretty powder blue box!!  Sigh!


The box is even beautiful and so very sturdy!


LOOK!!  Look!! Aren't they beautiful!!  They even smell good!!  


There was a fun gift inside.  A nummy sour apple sucker and a fun pin with a lovely Edwardian lady on it!  Again, the nerve of my son was astounding!  He asked if he could have my sucker!!  Has he taken leave of his senses?  Good heavens!!!  Hahahahaha!!!


Holy Monkey are these babies comfy!!  I ADORE them!  They fit wonderfully (because there is no toe box...didn't have a clue what that was but Lauren educated me....) so I ordered a size larger than what I usually wear to accomodate stockings and perhaps a insert.


Tra-la-la-la-laaaaaaaaa!!!  They work perfectly with the outfit!!  I am so very pleased!!!  I have plans to make many dresses from the 1830s to the 1860s so these sweet boots will get lots of use!!

Well, that is it for accessories for Autumn in Cranford!  Can't wait to put them all together!!

Be Blessed My Friends!!

g


Friday, September 26, 2014

Pollen Pom Pom Tutorial

Buzz, buzz...buzz, buzz, buzz...


A quick picture of me in my Bee Costume...I want to visit a garden and have my Mama take some pictures with her fabulous camera...until then, this is a picture that a lovely lady at the school took of me using my phone...


A little girl in the first grade class drew this for me!  Isn't it brilliant???!!!!  I ADORE it!!!  Espceially the "polin" in the center of the flower!!  She was so sweet!!!


Pollen Pom Poms

For the decoration on my Spelling Bee dress shoes, I wanted a representation of the pollen that bees collect when they are visiting flowers.  I didn't have to think long and hard as to what would do the trick for that element of the costume, as I knew exactly what I wanted.  For Costume College, I made a set of ivory pom poms for the shoes that I wore with my Lizzie Bennet wedding dress and knew that the same general idea, but bigger would be perfect!  The inspiration came from this fabulous pair of Regency Era shoes from the Worthing Museum and Art Gallery Costume Collection.  During the construction of the Lizzie Bennet pom poms, I didn't take very good documentation photographs as I was in the creating and construction zone...that is, when all I can focus on is thinking about how I am going to make the thing and doing it quickly before I forget how my mind is telling me to make it!!  

Quinn of The Quintessential Clothes Pen had said in one of the comments, if next time I made shoe pom poms, could I please take more pictures. So, this time around I made an extra effort to take tons of pictures.  I took 26 to be exact!  I am quite proud of myself!


Close up of pollen pom poms on my velvet shoes.

Pom Pom Base

You want to make a base for your pom poms.  I used the yellow silk that I used on my dress.  So far I have only used dupioni silk for the pom poms and it has worked beautifully!  I am sure that anything that can fray will work.


1.  Cut rectangles on the bias for the base of the pom pom.  This is very important as you don't want your rectangels unravelling as you work with them.  You will pleat these with as large or small of pleats as you want.  On the original, the pleats are incredibly small, like ridiculously small.  I do not have the patience nor the wish to make pleats that small. If you have a pleating fluter use that!!  For those of you who like numbers, I have placed rulers next to the fabric pieces so you can see the sizes.  For the Lizzie Bennet shoes, the rectangles were longer.


2.  Pleat your rectangles.  I didn't have a perfect pleater this small to assist me with the pleating, so I eyeballed it.  You can totally measure out your pleats if that suits your fancy.  Be aware that as the rectangles are cut on the bias, they will tend to wave and want to twist.  Just work slowly and it will be ok.  You will see below that it really doesn't matter in the end.  (The pieces above sort of remind me of the roofs of the Hobbit houses in LOTR!)


3.  When your pleats are done (don't forget to sprtiz them with vinegar water to set the pleats), find the center of the pleats.  You can measure or eyeball, it doesn't matter.  Using a gathering stitch, stitch up the mark you made up the middle.


4.  Gather your gathering stitch.  Don't do anything with the threads yet as this is just to see if the width of the pleated panel is ok.  I discovered that the pleats wouldn't make a nice circle when I joined the ends together.   It would have been ok if I left the ends open and not circular, but for the look I was going for, the ends needed to be cut.  So cut them I did.  I took about 1/2" off of both sides.


Here, you can see that the pleat panel is skinnier.


5.  After you gather your gathering stitch as tightly as you can without breaking your thread, tie both ends off.  If you want a complete circle pom pom base, take the sides of the pleated panel and on the underside of the base, just whip stitch the ends together.  Do this on both sides.


Here I have two nicely rounded pom pom bases.  If I had left the sides uncut, the bases would not have retained thier pleats as they would have had been pulled out to accomodate the longer sides.  They look different sizes in the picture, but my phone camera does this for some reason...

Bow Loop Straights

For the next section of pom poms, I made these.  Don't know what they are called.  They can't be called bows as I cut them.  Sticks?  Straights?  For now we shall call them straights.


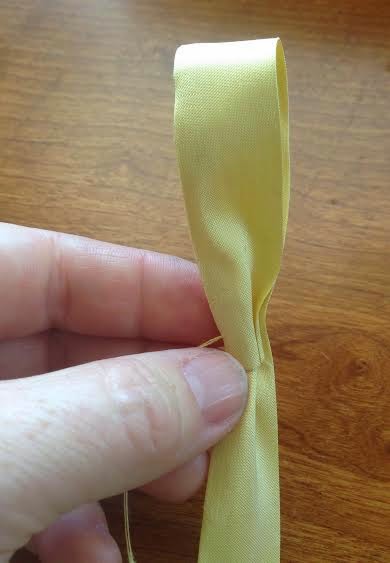
1.  (I totally forgot to put a ruler by my strips of fabric here!! Sorry!!!)  Ok, I do know that I made them 2" wide and used a 1/4" seam allowance.  For length...I want to say 22".  I used a scrap piece of fabric.  DO NOT cut these on the bias as you need the straight of grain for the fringe.  Sew your strips using 1/4" seam allowance, press seam open, turn inside out, press seam again.  Now you want to flatten it with the seam on one side of the strip.  That is to say, make the seam one of the creases in the strip.  When the strips are ironed flat, they should resemble chunky ribbon.

2.  Start making your bow.  I begin by taking one end of the strip and, using a needle and thread, gathering the end.  Don't knot it off and cut it as you will use this continuous thread for the whole bow.  This is where you get to decide how big you want your bow.  The end of the strip will be the "center" of the bow, so where you "bend" your loop is how big your bow will be.  Tack the end to the strip.


3.  For your second loop, eyeball what you believe will be the same length of loop.  It truly doesn't matter if the loops are equal for this pom pom, as you will end up cutting the loops anyway.  I like to "bend" the loops to the back, not the front as it gets confusing...so always bend to the back.  You now have three layers of strip.  Sew through the end of the strip through all three layers.  Remember, the end of the strip is the middle.


4.  For loop three, do the same as loop two but place it off center.  For the Lizzie Bennet pom poms, I only used 4 loops.  (And looking back at that post, I made them differently.  Oh well!  Now you have two ways to do it!) Tack down that loop at the middle.  The loops that are off center will want to move back to center.  Don't let them.  You are the mistress of the loop!!!  Make them do your bidding!!  This means, tacking them in place.


5.  Loop 4...same as loop 3.  Tack the loop off center.  You will do this for loop 5 and 6 until you have what looks like a 6 pointed star or flower.  When you are done tacking, knot off your thread and cut off any left over strip.


Lovely, loopy bows.  If you want to use these sweet bows, they would be wonderful and would look very nice.  You would also perhaps want the to be a bit more equal in their length.  If not...keep reading.  If you look closely at the bow on the right, you can see where I tacked the off center loops..."Stay I tell you!!!!"


Right then...for these shoes, I like the look of the frayed edges of the straights and not the nicely looping curves on the bows above.  To get this look, I ironed them flat then cut the loop. (When you iron the loops, the crease is a perfect guide for cutting.)  Now I have 12 straights and not 6 loops. 

On the right above, is the ironed flat bow.  On the left is the cut loop straights.  


6.  Now if you are wanting to fray the ends, here is where you do that.  (Be sure you are using fabric that will lend itself easily to fraying or you will get immensely frustrated.)  I started out using a pin, but ended up using my seam ripper.  You need have a lot of patience during this part of the process.  Stick your pin or seam ripper through the upper most threads of the fabric...if you look closely, you will see the individual fibers/threads running horizontally across your straight.  These are the fibers/threads that you want to remove to achieve the frayed look of the straights.  Gently lift your pin/seam ripper up taking the threads as you go.  Use your fingers to remove the threads.


Sorry for the fuzzy shot...here you can see the threads that are being removed.


This is what you want.  I liked a lot of fray on my straights so I took out a lot of fibers/threads.


Taaaaa daaaaaa!!!!  Frayed straights!  If you discover that some of your straights are longer than the others, simply cut them shorter and fray the ends some more.


7.  Tack the "straight stars" to the pleated bases.   (Sort of spread the striaghts out so they are not right on top of each other.)

Mega Frayed Centers

This is the part that will consume the most time while making your pom poms...so put on your favorite song or movie from Netflix, cause you will be here a bit.  


1.  Cut on the grain a strip of fabric.  Mine was 2" by  around 14".  The type of fabric you use will more than likely determine how long your strip is.  The dupioni I used is nice and thin so I had to use a long strip.  

Zig zag stitch along one long end.


2.  Start at the opposite side of the zig zagged stitching and begin unravelling!  You can go as long or as short as you wish.  For the Lizzie Bennet pom poms, I didn't unravel that much.  I wanted LONG puffs for the pollen pom poms.  For this strip, I alternated between a pin and a seam ripper.  I only removed 2 threads at a time as any more and they began to break in the fabric.  (The above picture was taken wile I am blogging now as I forgot to get a picture of the unravelling...)


You can see some of the threads above have gone all weird and spastic, so I used a hair comb to straighten them out.

3.  When you get to where you like your fray length, look at the remaining intact, unfrayed fabric.  On mine, I had about a 1/2" too much remaining, so I re-zigzagged the bottom and cut off the remainder.  

4.  Sew a gathering stitch along the bottom between the fray and the zigzag.  Gather until it's tight-ish.  You will then take one end and start wrapping it around itself.  Sort of like wrapping a piece of paper around itself to form a straw, but tighter.


5.  When you have the puff wrapped around itself, use the gathering stitch threads and wrap those around the base as tightly as you can without breaking the threads.  You will cry if you break your threads.  Knot the threads off.  Next, take a needle and doubled thread and really snug up the puff, you want it to be tightly compacted.  You can see above that the snugging thread is right at the base of the frayed bits.  This is important for the next step to be successful.  Knot off the thread.


6.  This step is very precarious.  Because the bottom of the puff is bulky and just weird, you want to cut it off.  Sooooooo....being very, very careful not to cut the snugging thread, cut off the base of the puff...the part that is zigzagged.


7.  You are almost done with your pom poms!!!  Generously apply glue (I used Aleene's Original Tacky Glue) to the end of the puff.  This step has a two fold job...it makes sure that you won't have lots of little pieces of fray escaping your puff and it connects the puff to the rest of the pom pom.

8.  Adhere the puff to the center of the pom pom and Voila!!!!!  Your pom pom is complete!  Allow to dry, then attach to your shoes via shoe clips, safety pins or glue...American Duchess has some shoe clip hardware that I am positive would work beautifully!!


Huzzah and away!!!  Fun Pollen Puff Pom Poms!!!  I ADORE these!  They are fun to look at and the puffs are fun to pet!  Hahahahahahaha!!!  I'm not even kidding you...

If you use this tutorial, I would LOVE to see what you create!!

Be blessed my friends!

g