To all who mourn in Israel, He will give a crown of beauty for ashes, a joyous blessing instead of mourning, festive praise instead of despair. In their righteousness, they will be like great oaks that the LORD has planted for his own glory. Isaiah 61:3
Showing posts with label Idaho Sesquicentennial. Show all posts

Wednesday, March 6, 2013

Idaho's Sesquicentennial


On Monday, March 4th, 2013, Idaho celebrated the 150th anniversary of being signed into a territory by President Abraham Lincoln and the Governor of Idaho, the Honorable Butch Otter held a Birthday Party for us!  It was held at noon at the Statehouse and may I just say that it was fabulous!!!!  The day was sunny and warm, the festivities were remarkable, the people were happy, the entire Idaho Legislature was in attendance, school children sang, American Indian Tribal Leaders from the Nez Perce and Shoshone nations were there, and of course I was finally able to wear my 1863 dress!!!

It was so very memorable, the whole experience.  The speeches were nicely said and I learned a lot more about the connection between this Idaho Territory, President Lincoln and the Civil War.  By signing the law that created the Idaho Territory, President Lincoln stopped any Westward expansion of the South and slavery during the Civil War and the gold and silver mined from our hills paid for weapons, ammunition and soldiers' salaries.  What a wonderful moment in time!

I am very proud of my Idaho and I love living here, and Monday just strengthened that pride in my home state!  


Another fun thing about the day was that I finally got to wear my 1863 outfit!  After working on this baby for 1.5 months, it was finally able to be worn in public!!  I loved every  minute of it!  I could not believe how utterly comfortable this whole outfit was!  The only thing that I did not like was wearing the heeled boots...which is no surprise as I hate wearing heels of any kind.    


I played around with Picasa and attempted to make a daguerreotype....didn't work so well, but at least it is black and white!


My wonderful friend Tammy and I inside the Capitol building.  We had so much fun on this day!!


The "Oregon" President Lincoln.  He had written a speech in the manner and words that the real President Lincoln may have written if he had been addressing the crowd in Boise.  It was a really fabulous speech and it made me cry!


Tammy and I with the Governor of Idaho, the Honorable Butch Otter.  He was a really nice man with a lovely sense of humor.  He even danced a little bit with Tammy!


Tammy and I with the "Idaho" President Lincoln.  He is the president of the Idaho Civil War Volunteers re-enactment group.


Sitting in the center star at the bottom center of the Statehouse.  There are three different types of marble in that star.  The red came from Georgia, the gray from Alaska, and the black came from Italy.  


The first time I saw Katherine Coran-Greig (Koshka the Cat) sitting like this at Costume College I have wanted to do the same thing.  It just looks so cute and fun!  I had the though of doing this outside, but then Tammy did it in the very center of the star!  Well, that idea sounded better to me as the inside is dry and the grass would probably have been wet!!


I wanted a pose that would look something like the ladies in the Victorian era would do.  They were so fun and cute!


Standing next to the newly appointed Abraham Lincoln Auditorium in the Capitol.  At 9:39 am on March 4, 2013, the Senate voted to approve Resolution HCR 5.  This would rename the Capitol Auditorium the Abraham Lincoln Auditorium.


 “Idaho was born out of political conflict, slavery, political disputes concerning Washington’s eastern boundary,” Senate Majority Leader Bart Davis told the Senate. “President Lincoln hoped that the creation of the Idaho Territory would serve as a further hedge against the spread of slavery and provide its ultimate abolition.”

The Senate voted unanimously in favor of the resolution.


We got to have our pictures taken in the Governor's Ceremonial Office.


I love this picture of Tammy and me on the Capitol steps.  You can see our petticoats!!  How fun!

Friday, March 1, 2013

1863 Dress Project: Dress Complete!!! Huzzah!

Self fabric buttons sewn on....check.
All hems sewn....check.
Stray threads cut....check.
Stupid undersleeves made and tacked in....check.
Boning sewn in....check.

Hhmmmm.....one more all over check....check.
Tried on to see if it fits....check.

AAAAAaaaahahahahahahah!!!  Houston, we have completion!!!  I am so excited I can barely stand it!!  I am finished with this HUGE project and am sooooooo relieved!  Talk about your large undertaking.  I didn't think that I would ever be done with this outfit.  But, it is completed and awaiting the official wearing!!!

Bring it!!!


Monday, February 25, 2013

1863 Dress Project: Hat Completed!!!

And here she is!  My 1860s not bonnet hat!  I am pretty happy with how it turned out.  I chose to cover it in the cotton velvet that I used on the dress.  I ruched the brim and draped the crown and crown top, and of course forgot to take pictures of that...ggggggrrrrrr.....


I dipped the front of the brim down as I had seen on several photographic images from the 1860s.  Antique black ostrich feathers facing back to front were sewn on....


Two beaded appliques that I have had forever were used to give it that extra little pizzazz!


I found this striped ribbon in my ribbon stash that I have had for about 10 years and totally forgot I had!  I matches the dress perfectly!  The picture makes it really ugly, but in real life it is quite lovely!


I like the look of the ruching on the brim here....

I sooooo cannot wait to wear this with my dress.  I wore it quite a while last night after I had made it.  It looked fabulous with my "I am sick and don't care what I look like" jammies!  hahahaha!!!

Now ALL I have left for this project is to make the under sleeves for the dress!  Huzzah!!


1863 Dress Project: Hat Construction

I have been really fighting a cold....well, I have actually caught it and am now attempting to try and keep it from descending into my lungs.  I had pneumonia a couple of years ago and DO NOT EVER wish to have it again.  So, yesterday while relaxing, I decided to work on my 1863 hat.  Really, it was very relaxing.  I just sat in a chair and calmly worked on my hat and today, I feel so improved!  Huh....does this mean that whenever I get sick I should work on a hat?  I think so!!

Anyway, I didn't want to make this hat from scratch as I just didn't feel it.  And I didn't have a pattern to work from and was to tired to make one up.  So, I went to my costume/supply hall closet and rummaged around until I found this beauty!


A cheap costume shop top hat that a friend gave me a while back.  Perfect!  The brim was just the shape I wanted for the hat and the crown, when cut down to size was perfect as well!  Yeah!


Lovely side view!


The first thing I did was wire the brim.  I had to hand sew it as it wouldn't fit my sewing machine.


 Next step was to figure out where I wanted to cut it apart.  For no apparent reason, I chose to make my cut line 1" above the "hat band" line that was creased into the hat.  I used tailor's chalk to make hash marks all the way around the crown.


Using an xacto knife to start and then surgical scissors to finish, I removed the top of the hat from the bottom.


Now I had to figure how how short I wanted the crown.  Again for no apparent reason, I chose to make connecting marks 1" down from the crown tip.  This line was where the top of the bottom part of the hat would meet the bottom part of the top of the hat! hahahaha!


Top and bottom matched up and pinned together...


Top and bottom sewn together!  Yeah!!!

Now it is time to re-cover and decorate!!!

1863 Dress Project: Hat Inspiration

Squee!!  I get to make a Civil War era hat!!  Huzzah!  Yes, I said hat and not bonnet.  For the longest time, I was under the assumption that there were only bonnets worn in the 1860s American Civil War era.  Ha!  Not so!  Oh, I knew there were the funnily named "pork pie" hats that I had seen over the course of the "I will NEVER make a hoop skirt" course of my costuming life.  Those are really neat!  But...BUT!!!  Not until I got my dress completed and looked at with furrowed brow trying to envision the hat that would be worn with it did I start really rejecting the thought of a spoon bonnet.  Don't get me wrong.  I adore the 1860s bonnets and I will make one this year.  I even have the antique horse hair braid that will more than likely be used to construct it.  However, the look of my dress has a wee bit of a militaristic look to it; a more suit like, tailored feel that just wouldn't mesh well with the sweet, feminine look of the bonnet.  So, to research mode I went!  I found out that the 1860s offered oh so much more by way of head toppers than I would have ever imagined!  My milliner's heart leaped for joy!!  hahahahahaha!!!  Here are some of the images I found that support the hat vs bonnet argument that was warring inside my noggin!


Empress Elisabeth of Austria, aka Sissi was exceedingly fashionable during her time.  And she stuck to a very strict exercise regimen .  Here she is in a lovely 1860s hat....


Love the look of this hat.


And again with a Wolfhound, dressed in furs and fabulous hat.


While researching, I came across this most fabulous website....and of course found these fabulous examples of hats from the 1860s....Love this lady's hat and ermine accessories!!  Laaaa!!


There are pages and pages of fabulous examples of hats and bonnets from many eras!!


Another wonderful hat example from The Barrington House.

Next up....make an 1860s hat!  


Sunday, February 24, 2013

1863 Dress Project: Sleeves Are In!!!

Huzzah!!  Sleeves made and set in!  Usually sleeves are a thorn in the side for me, but these babies went in smoothly!!  Soooooo excited about that!  No wailing or gnashing of teeth with these!  I tried the bodice on this morning and it fit perfectly!  Now all that is left for this part is to purchase more buttons to cover for the tabs.....


Sooooo close!  Need to make under sleeves...will be doing that tomorrow....

1863 Dress Project: Fixing the Soutache..

Sometimes OCD is a good thing...sometimes it is just a pain in the rear...sometimes it is both.  Like when I noticed that the soutache surrounding my velvet tabs was off.  When pinning the soutache to the bodice, I measured out from the armscye to make sure that it was even from the outside in.  Then for some reason I thought that I needed to make the soutache on the right side one "square" shorter than on the left side.  I do not know why.  Sometimes the workings of my brain totally fail to make sense.  But after looking at the bodice with a critical eye, I noticed my mistake....


Weird thinking made the soutache off....


Fixed soutache....much better!!!

Friday, February 22, 2013

1863 Dress Project: Working on the Bodice...

Ahhhh....it is time.  Time to make the bodice out of my fashion fabric.  Ugh.  I hate making bodices to be quite frank!  Skirts....easy peasy!  Hats?  A cinch!  Corsets?  Ok, not so simple, but oh so much better than working with bodices.  I do not know why, but I believe bodices to be one of the banes of my existence!  Honest!  I do however have high hopes for this one as the mock fit perfectly!  We shall see....


Here is the basic shape...fits pretty well so far!  Yeah!!!


Playing around with the trim on Emma.....Hoping it won't be a super pain in the rear to sew on....


Right then...the velvet ribbon has been pinned on and I am using the camera and flash technique to make sure that the pieces are facing the same way....looks good....


Huzzah!!  Or so I thought.  I worked for hours making sure the ribbon and soutache were perfectly placed...hours more sewing everything on the way it was supposed to be, put the bodice on Emma, stood back and was really getting excited.....then to my horror, I saw it.  The thing I did wrong......

Why is it that with every project, and I mean EVERY project, there are colossal quantities of time spent ripping out something...a seam, a hem, in this case soutache?  Why?  I don't ask for a lot.  Just for a project to run smoothly.  It's not like I am asking for a million bucks or for there to be a worm hole I can travel through!  Just that one project will not involve the use of my seam ripper!!!!

Sorry, I totally digressed!  Ok, so anyway, I ripped out all the soutache on the left side of the bodice as it was all wrong.  If you look close enough you will catch it.  Go ahead...look.  It's alright.  I am fine with it now, because last night at midnight when I couldn't sleep because my OCD was screaming in my head to get my butt out of bed and fix the mess, I did just that.  Grrrrrrrrrr.....Oh well, all is well now!!  Yeah!!!!  

I'll post those pictures later!!


1863 Dress Project: Skirt Complete!

Well, the skirt has been completed for about a week, but I kept forgetting to post pictures of it!  I am getting sick, so I will blame it on that!  Ha!  It feels so weird wearing this outfit as there is so much to it!  And the bell shape of the skirt and hoops is just so different from anything I have ever worn costuming wise!  


Picture of the inside of the skirt....there is a 12" hem of taffeta!  Whoo!  Usually my hems are 1 - 1.5"!  Again, I love the window pane design of this fabric as it is the perfect measurement for my stitches!!


Completed skirt with tabbed hem.....


I didn't really realize how much the back popped out until I got the skirt on....thank God for that yoke in the back!!


Mom came over the other day and I was playing around with buttons and we decided that the tabs needed buttons to make them look completed!  I like them a lot!!!

Thursday, February 21, 2013

1863 Dress Project: Bodice Mock Up

Ok, this is just the weirdest thing.  This has never happened to me.  I think that I should go out and buy a lottery ticket.  My muslin mock that I made for my 1863 dress FIT!  Seriously.  Usually I have to tweek a shoulder seam here, nip the dart at the waist there, elongate the waist line, do SOMETHING...this time, I did nothing.  Nothing!!!  It was the weirdest thing.  I just don't know what to think...but Yeah! Anyhoo, here are pictures of the bodice mock up....


It fits Emma sort of nicely.  She has a waaaay longer waist than I do...


On me...I hate taking pictures of myself....But I tried to not look too ridiculous!!


Wow!  I still cannot bet over how well it is working!  


Can't wait to make the real bodice and add boning.....


The pattern that totally fit on the first mock up!!!  Huzzah Simplicity!!!


Wednesday, February 13, 2013

1863 Dress Project: Cartridge Pleating...

Whoo hoo!!  I had never made cartridge pleats until yesterday!  I had always looked upon them as super cool, but maybe they would be super difficult to make!  Maybe it was the type of fabric I used, or the fact that I didn't interline the skirt (I have found extant evidence that some skirts were not interlined) making the fabric not so bulky...whatever the reason, my cartridge pleats went together so beautifully!  I absolutely loved the whole process!  I followed the steps I read from many blogs and costuming sites....one of my favorites being Historical Costuming's article on cartridge pleats....


I do believe I will be employing this method of taking ridiculous quantities of fabric and making it fit into a very little...well not SO little....space again!   


Here are my cartridge pleat thread lines.  The top thread I left white as it would be hidden beneath the waist band.  The bottom two I Sharpie'd black as I didn't have any heavy duty thread on hand in the shade of black and really didn't feel like venturing out in the cold to acquire some.  The Sharpie worked wonders!!!


What my cartridge pleats looked like after I laid them down and sewed them to the outside of my waistband.  I totally forgot to take pictures of them sans the waistband and for that I am sorry.  But here you can see how uniform and lovely they are!  

Tomorrow I will take pictures of the completed skirt!  I am quite in love!

1863 Dress Project: Trim Progress....

While working on the trim for my skirt, I ran into a couple of problems.  I do believe they occurred as a result of my being super tired and being in a hurry.  Both very bad things when you are wanting to do a really good job on your project.  The first problem I had was not paying attention to the grain or weft or warp or whatever it is called on my velvet.  Remember when using velvet to always cut your pattern pieces in the same direction.  Like all of your bodice pieces need to be top side up....or you will run into trouble...


Like this.  I had cut out three trips of velvet for the bottom hem of my skirt and ended up sewing the wrong pieces together.  I realized this when while I was sewing the second piece started slipping around like craze.  The first length stayed nicely on my green fabric, but when the second length came along....slip sliding away!!!  So, I did what my fabulous sewing friend, Josie, told me to do when I ran into this brand of trouble while using wool....take a picture of your fabrics using the flash of your camera.  If it looks like the above image, pieces were sewn together the right way.


I ripped out the seams, pinned the fabric pieces together the right way and took the picture again and checked it out.  The pieces looked identical signaling that they were going the right way!  Yeah!!!   


Ribbon tabs and soutache sewn on.  I ran into trouble sewing on the soutache as well.  One evening I pinned and sewed on all the soutache on one half of the skirt.  Then as my stupid luck would have it....I ran out of soutache.  After acquiring more soutache, I set about pinning and sewing the soutache to the other half of the dress.  I was ecstatic to sew the back seam together and start on the hem....when what should my disgusted eyes see?  I had sewn all of the soutache on the other side of the skirt on WRONG!!!!  Holy Monkey!!  Oh how irritated I was.  And because I am me, I spent the next three hours picking out the soutache, repinning it and sewing it down!!!  GAH!!!!  Reminder to myself....check, double check and triple check!!!!

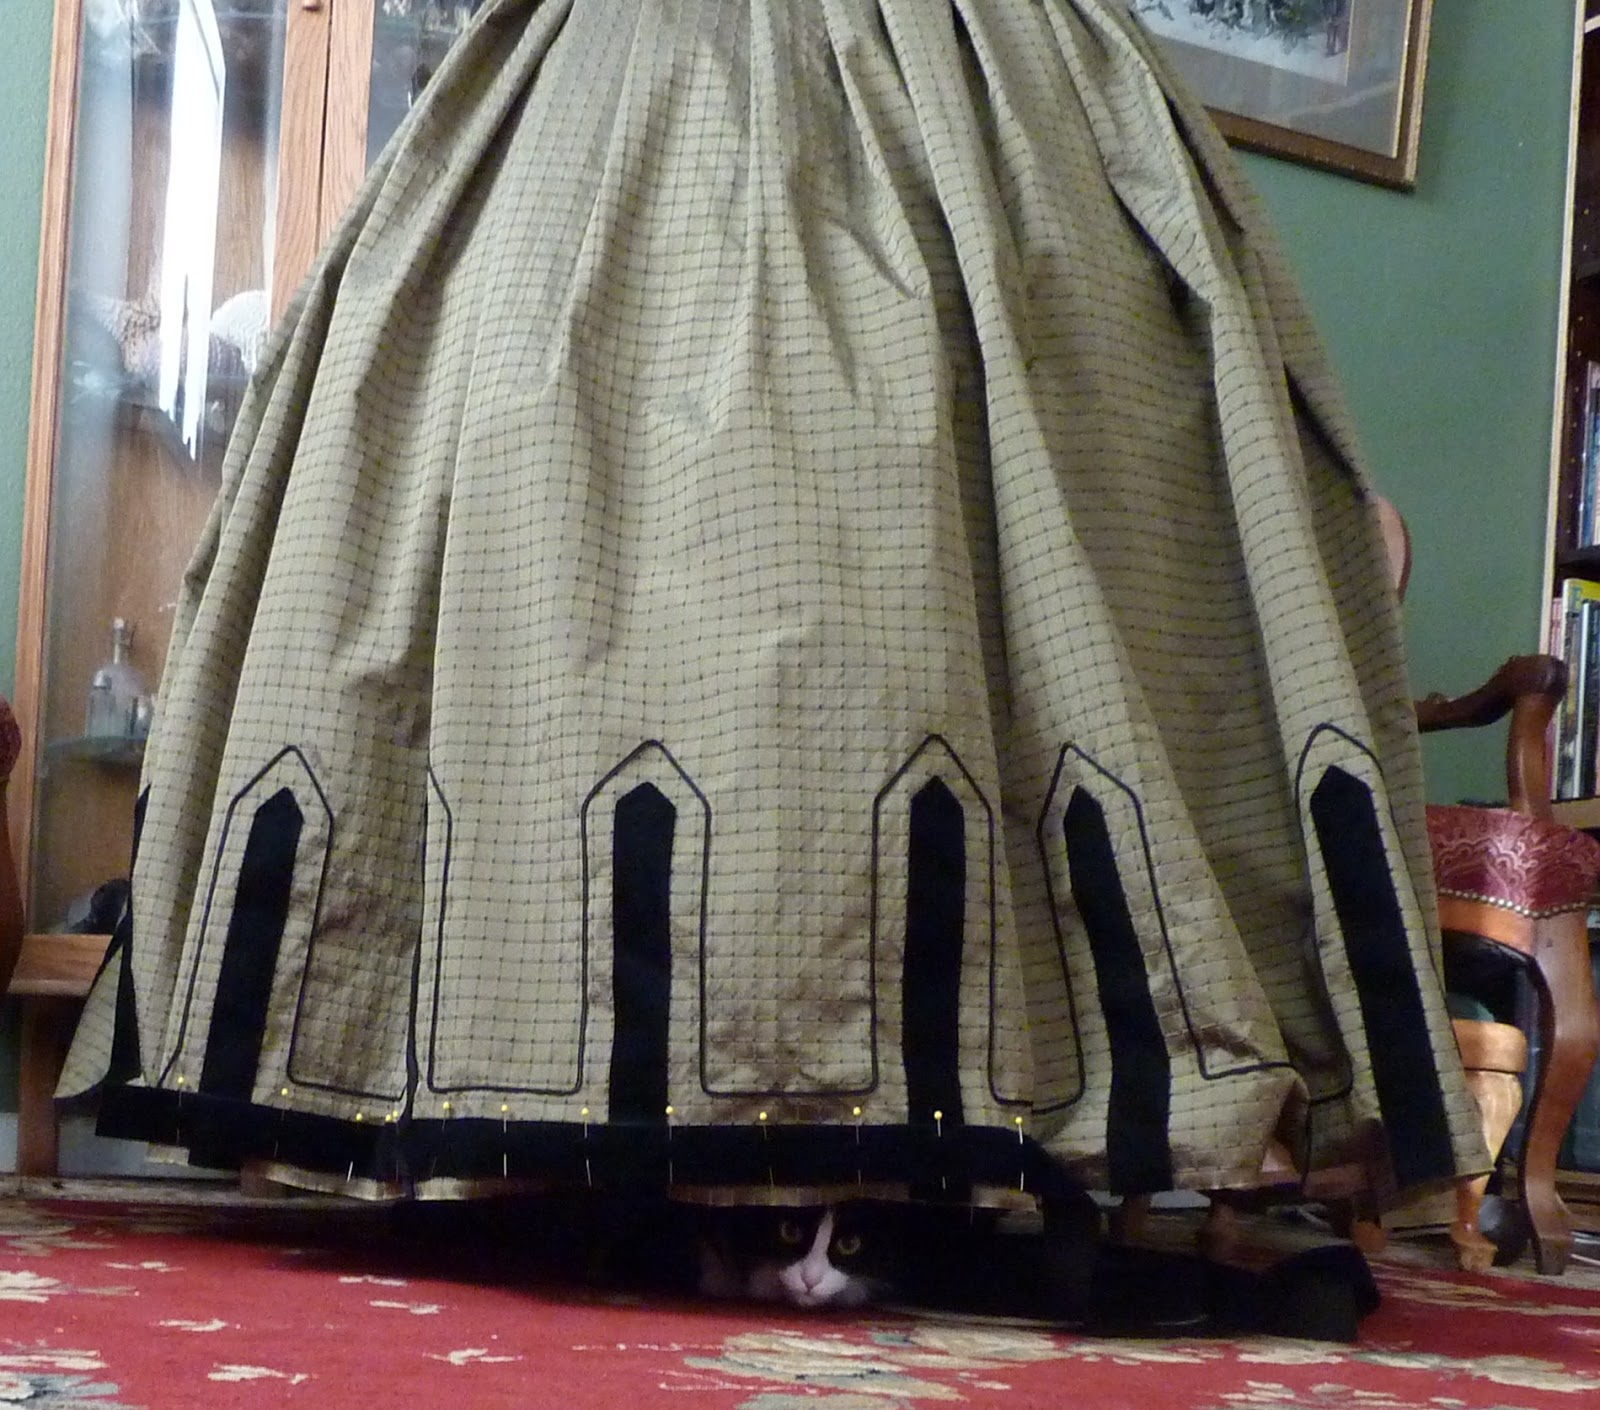
I think it is so cute that Rosie the Cat loves to hide under the skirt!! 


I just need to share this photo.  I am so in  love with this fabric.  It has a raised window pane grid that has proven so handy in sewing just almost all of everything that has to be sewn on this skirt!  Here, on the bottom of the picture is the green taffeta that I used for the 14" deep hem.  It nicely covered all the black stitching from the soutache and ribbon tabs.  Every intersection of the crosses I used as the stitch mark for my hem stitch!  Love it!!!