To all who mourn in Israel, He will give a crown of beauty for ashes, a joyous blessing instead of mourning, festive praise instead of despair. In their righteousness, they will be like great oaks that the LORD has planted for his own glory. Isaiah 61:3
Showing posts with label Merlot Wool Suit. Show all posts

Sunday, December 9, 2012

1910 Merlot Winter Wool Suit Complete!

Whoa!  It has been a loooooong time since I last posted!  I have been busy costuming a play and dressing models up in my dresses for a Victorian Fashion show, but all of that is over now!  Yeah!!  So, I thought I would post pictures of my Merlot suit!  We had a Christmas party tonight and when Mom came over to get dressed, I snagged her to take some photos of me in the suit.  Then I played around with them on Picasa to make them look like the tinted photos that were popular in the Victorian and Edwardian era.  I really like how they turned out!  Here they are!  Oh yes, and my wonderful ermine!!


The front...This pose was in honor of the beautiful Edwardian beauty Camille Clifford!


Back pose...


Yeah!  Now, next year the wool suit will be in green!!


Friday, November 16, 2012

Merlot Wool Winter Suit Done!!!

Well, finally the Wool dress is done!  Actually wait.  I need to cover more buttons and sew them onto the skirt.  But after that it will really be done!  The Saturday after Thanksgiving, I will be wearing it in the Holiday Parade and then to the Christmas Tree lighting at the Boise Capital building!


Ermine accents make it all the more lovely!!!  Can't wait to wear it!

Sunday, October 28, 2012

Merlot Wool Suit Jacket Complete!!!

The jacket is done!  Yeah!!  I found some really lovely tatting in my stash and fell in love with it for this project!  Tomorrow I will be starting on the skirt, that is if I can drag my butt out of bed.  I am still so beat from the past two weeks....


Front with the frogs and buttons and trim!


The front dips down a smidge as opposed to the back, but that is ok with me!


Back.  You can see the sleeve decoration.  That had my brain working in over time to figure out how to make it look like the original.  Happily, everything came together in a manner to my liking!  

Next, I tackle the skirt.  I am hoping it goes together more quickly!!

Merlot Wool Suit Moving Along Nicely!!

Ohmygosh....I cannot believe how crazy my life has been these past few weeks!!  So crazy that I don't know up from down, left from right, winkon from nod....UGH!!  So, I am going to be doing some retro-posting on my wool suit!  This post will be the post about working on the jacket.  May I just say that I love working with wool?  It is glorious!!  It doesn't unravel, it irons beautifully, and it is a dream to sew.


Front of jacket


Side....I am having issues with the use of the twill tape.  It is a little thick and in the future will not be used.  That being said, I hope I can find a suitable replacement or I just won't make anything similar!


I am liking the back with the buttons and different textural look!

Friday, October 12, 2012

Merlot Mock Up

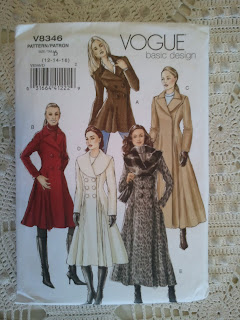
Mock up time!!  Well, my mock fit really well.  I did have to do the usual tweaking here and there, but on the whole it fit fabulously! The Vogue 8346 coat pattern worked wonderfully!!  Huzzah!!  I needed to make sure the the coat in the back was long enough to accommodate all the trim in the back, so I laid it out on my ironing board and went to work...


All the lovely back trim!  Swoon!!!


Here in the close up, you can see on both the right and left side, you can see the tape goes into the fabric.  I had to play around with mine to get it right....and the side panels are not sewn together right sides together, but rather a flat felled seam.


So, I sewed the seam down to where I thought the tape would disappear under the fabric.  I made a cut line and a fold line, then ironed a crease for where the flat felled seam edge would go....my seams are super small here...I made them larger when I re-did the mock.


I pinned the seams down and anchored them to the ironing board so that when i inserted the tape, the fabric wouldn't move about.


Ha!  It worked!


Now, just make sure that everything was looking ok space wise, I also added the tape up the back slit and the buttons and soutache loops.


This part, as you can tell, took a lot of moving and writing on my mock!  I love mocks for just that reason!!! I finally got down what I needed to, everything placed to where I wanted it!!


New longer mock.  As you can see, I goofed on the left side, so just made the correct adjustments on the right!!  Now for seam ripping, ironing, and cutting out my fashion fabrics!!!


Alchemy in Patterns...Or, Combining Two Patterns to Get the Look I Want!

Ok, maybe Alchemy is the wrong word, but I liked how it sounded!  Anyhoo, while studying the bodice of the original wool suit, I noticed that the side front seams disappeared into the armscye.  Weeeeeeel, the Rockinghorse Farm pattern is not that way.  The side front seams go all the way to the shoulder seams....poop.  So, what did I do?  Did I draft my own pattern pieces with the confidence of those ever so lucky to have that incredible talent?  NOOOOOOOO!!!  I invaded my stash of patterns in a frenzied search to find a pattern whose side front seams disappeared into the armscye!!  And thank the Lord!!  I found one!!!


Original!


Rockinghorse Farms Pattern....Beautiful, but wrong side front seams....


Vogue to my rescue!!!  laaaaaaaaaaaa!!!!!  So, now to bend it to my will!!!  (insert evil cackling laughter here.....)

Tuesday, October 9, 2012

DIY Frog Tutorial.....

The closures on the fabulous wool suit are really neat-o frogs.  I want to keep to the spirit of this outfit as closely as I can, so I need the frogs to be in the same color scheme as the rest of the suit.  Looking at the frogs in the picture and letting my mind ruminate on how I would go about making the frogs, I came up with an idea!!


Frogs on the original suit.  I love these!  They are really neat...except the straight pieces sticking out to the sides of them....


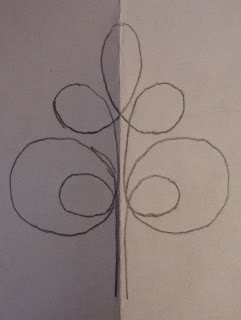
To start things off, I folded a piece of paper in half and copied half the design.


Flipping the paper over, I traced the half design to make a whole design.  This way, my design would be relatively equal on both sides.


I have had this piece of florists Styrofoam laying around forever, and I totally found a use for it!!!


After pinning the design to the foam, I began arranging the soutache.


After fiddling with the soutache for a while and not being happy with the outcome...it kept twisting and turning on me...I looked up on line how to work with soutache, and found this from "Threads Magazine"...


Ohmygosh!!  This technique totally made the soutache workable!!  I was so excited, and nobody was at home to share my excitement with me!

I folded the soutache in half, found the center and began working at the top of the design.


I first did one side of the design, pinning at various points as I went...


Then arranged the other side.


Now it was time to sew the frog together.  I had noticed on the back side of frogs that there is an over abundance of stitching.  All the better to hold the frog together!  Everywhere the soutache met, I whip stitched the pieces together.


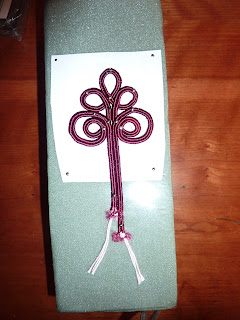
After the sewing was complete, I unpinned the frog from the foam and flipped it over...WOW!!  It worked!!!


After making a loop on one side, I sewed a button on the other side!  Voila!  A custom dyed frog!  Sweet!


Two Toned Self Covered Buttons Tutorial

 I got a lot done today by way of trim for the Merlot suit.  First off was buttons.  The original has really cool two toned self covered buttons.  The color of the trim in the center and the color of the suit on the outside.  I pondered at great length as to how I would accomplish this feat of button engineering and came up with a solution that I think will work. 


The buttons on the original.  I am sure that the makers of these buttons had some fabulous machine to make them look this awesome.  I just have my hands, a pair of scissors and the self covering buttons from JoAnn's.


First off, I cut small pieces of the twill trim and glued them to the top of the button.


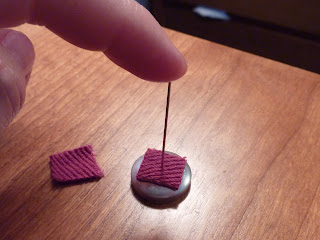
I took a straight pin and marked where the very center of the button was.


If you look real close, you can see the minuscule whole the pin made.  I cut a whole in the center of a piece of the wool, then glued all the way around it, making sure the get very close to the inner edge.


Very carefully, I laid the wool over the twill and waited patiently for the glue to dry ALL THE WAY.  I am not kidding in the least when I say I waited for the glue to dry all the way.  Well, at lease I did on the second button I made....


Because this is what happens when the glue is not dry all the way.  The wool, which just so happens to be a tad bit stretchy, gapes wide open at the whole!  Super!


After completely dry, I used two of the button covering methods.  This first try I used the above kit.  The button mold on the left, where the button is now placed was the actual size that came with the 5/8" buttons.  Unfortunately, it was too small a fit for the wool covered button and started the whole stretching process, even though it was completely dry.


I used the mold that was the next size up and it worked just fine.


This method is the one where the button top has the teeth all the way around the under side and you use a hammer to pound the bottom onto the top....


Place covered and "toothed" button on the mold.  Cover the button with the bottom part.


Here you can see the "sticky up" part of the thing I am holding...WOW great terminology, but I can't think of better words.  That part fits into the groove of the button bottom.


Like so.


The the part that you hammer goes on top of the big round thing!!  hahahahahaha!!!  Sorry!  Then you hammer the pieces together!!

The final buttons....They look different sizes here, but they aren't...weird.

So, there you have it!  Two tone, self covered buttons!!  Laaaaaaaa!!!