
Buzz, buzz...buzz, buzz, buzz...

A quick picture of me in my Bee Costume...I want to visit a garden and have my Mama take some pictures with her fabulous camera...until then, this is a picture that a lovely lady at the school took of me using my phone...

A little girl in the first grade class drew this for me! Isn't it brilliant???!!!! I ADORE it!!! Espceially the "polin" in the center of the flower!! She was so sweet!!!
Pollen Pom Poms
For the decoration on my Spelling Bee dress shoes, I wanted a representation of the pollen that bees collect when they are visiting flowers. I didn't have to think long and hard as to what would do the trick for that element of the costume, as I knew exactly what I wanted. For Costume College, I made a set of ivory pom poms for the shoes that I wore with my Lizzie Bennet wedding dress and knew that the same general idea, but bigger would be perfect! The inspiration came from this fabulous pair of Regency Era shoes from the Worthing Museum and Art Gallery Costume Collection. During the construction of the Lizzie Bennet pom poms, I didn't take very good documentation photographs as I was in the creating and construction zone...that is, when all I can focus on is thinking about how I am going to make the thing and doing it quickly before I forget how my mind is telling me to make it!!
Quinn of The Quintessential Clothes Pen had said in one of the comments, if next time I made shoe pom poms, could I please take more pictures. So, this time around I made an extra effort to take tons of pictures. I took 26 to be exact! I am quite proud of myself!

Close up of pollen pom poms on my velvet shoes.
Pom Pom Base
You want to make a base for your pom poms. I used the yellow silk that I used on my dress. So far I have only used dupioni silk for the pom poms and it has worked beautifully! I am sure that anything that can fray will work.

1. Cut rectangles on the bias for the base of the pom pom. This is very important as you don't want your rectangels unravelling as you work with them. You will pleat these with as large or small of pleats as you want. On the original, the pleats are incredibly small, like ridiculously small. I do not have the patience nor the wish to make pleats that small. If you have a pleating fluter use that!! For those of you who like numbers, I have placed rulers next to the fabric pieces so you can see the sizes. For the Lizzie Bennet shoes, the rectangles were longer.

2. Pleat your rectangles. I didn't have a perfect pleater this small to assist me with the pleating, so I eyeballed it. You can totally measure out your pleats if that suits your fancy. Be aware that as the rectangles are cut on the bias, they will tend to wave and want to twist. Just work slowly and it will be ok. You will see below that it really doesn't matter in the end. (The pieces above sort of remind me of the roofs of the Hobbit houses in LOTR!)

3. When your pleats are done (don't forget to sprtiz them with vinegar water to set the pleats), find the center of the pleats. You can measure or eyeball, it doesn't matter. Using a gathering stitch, stitch up the mark you made up the middle.

4. Gather your gathering stitch. Don't do anything with the threads yet as this is just to see if the width of the pleated panel is ok. I discovered that the pleats wouldn't make a nice circle when I joined the ends together. It would have been ok if I left the ends open and not circular, but for the look I was going for, the ends needed to be cut. So cut them I did. I took about 1/2" off of both sides.

Here, you can see that the pleat panel is skinnier.

5. After you gather your gathering stitch as tightly as you can without breaking your thread, tie both ends off. If you want a complete circle pom pom base, take the sides of the pleated panel and on the underside of the base, just whip stitch the ends together. Do this on both sides.

Here I have two nicely rounded pom pom bases. If I had left the sides uncut, the bases would not have retained thier pleats as they would have had been pulled out to accomodate the longer sides. They look different sizes in the picture, but my phone camera does this for some reason...
Bow Loop Straights
For the next section of pom poms, I made these. Don't know what they are called. They can't be called bows as I cut them. Sticks? Straights? For now we shall call them straights.
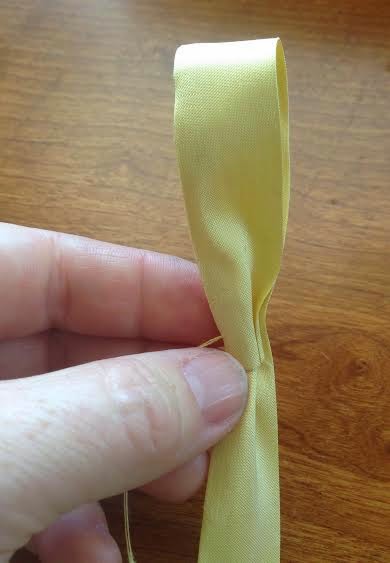
1. (I totally forgot to put a ruler by my strips of fabric here!! Sorry!!!) Ok, I do know that I made them 2" wide and used a 1/4" seam allowance. For length...I want to say 22". I used a scrap piece of fabric. DO NOT cut these on the bias as you need the straight of grain for the fringe. Sew your strips using 1/4" seam allowance, press seam open, turn inside out, press seam again. Now you want to flatten it with the seam on one side of the strip. That is to say, make the seam one of the creases in the strip. When the strips are ironed flat, they should resemble chunky ribbon.
2. Start making your bow. I begin by taking one end of the strip and, using a needle and thread, gathering the end. Don't knot it off and cut it as you will use this continuous thread for the whole bow. This is where you get to decide how big you want your bow. The end of the strip will be the "center" of the bow, so where you "bend" your loop is how big your bow will be. Tack the end to the strip.

3. For your second loop, eyeball what you believe will be the same length of loop. It truly doesn't matter if the loops are equal for this pom pom, as you will end up cutting the loops anyway. I like to "bend" the loops to the back, not the front as it gets confusing...so always bend to the back. You now have three layers of strip. Sew through the end of the strip through all three layers. Remember, the end of the strip is the middle.

4. For loop three, do the same as loop two but place it off center. For the Lizzie Bennet pom poms, I only used 4 loops. (And looking back at that post, I made them differently. Oh well! Now you have two ways to do it!) Tack down that loop at the middle. The loops that are off center will want to move back to center. Don't let them. You are the mistress of the loop!!! Make them do your bidding!! This means, tacking them in place.

5. Loop 4...same as loop 3. Tack the loop off center. You will do this for loop 5 and 6 until you have what looks like a 6 pointed star or flower. When you are done tacking, knot off your thread and cut off any left over strip.

Lovely, loopy bows. If you want to use these sweet bows, they would be wonderful and would look very nice. You would also perhaps want the to be a bit more equal in their length. If not...keep reading. If you look closely at the bow on the right, you can see where I tacked the off center loops..."Stay I tell you!!!!"

Right then...for these shoes, I like the look of the frayed edges of the straights and not the nicely looping curves on the bows above. To get this look, I ironed them flat then cut the loop. (When you iron the loops, the crease is a perfect guide for cutting.) Now I have 12 straights and not 6 loops.
On the right above, is the ironed flat bow. On the left is the cut loop straights.

6. Now if you are wanting to fray the ends, here is where you do that. (Be sure you are using fabric that will lend itself easily to fraying or you will get immensely frustrated.) I started out using a pin, but ended up using my seam ripper. You need have a lot of patience during this part of the process. Stick your pin or seam ripper through the upper most threads of the fabric...if you look closely, you will see the individual fibers/threads running horizontally across your straight. These are the fibers/threads that you want to remove to achieve the frayed look of the straights. Gently lift your pin/seam ripper up taking the threads as you go. Use your fingers to remove the threads.

Sorry for the fuzzy shot...here you can see the threads that are being removed.

This is what you want. I liked a lot of fray on my straights so I took out a lot of fibers/threads.

Taaaaa daaaaaa!!!! Frayed straights! If you discover that some of your straights are longer than the others, simply cut them shorter and fray the ends some more.

7. Tack the "straight stars" to the pleated bases. (Sort of spread the striaghts out so they are not right on top of each other.)
Mega Frayed Centers
This is the part that will consume the most time while making your pom poms...so put on your favorite song or movie from Netflix, cause you will be here a bit.

1. Cut on the grain a strip of fabric. Mine was 2" by around 14". The type of fabric you use will more than likely determine how long your strip is. The dupioni I used is nice and thin so I had to use a long strip.
Zig zag stitch along one long end.

2. Start at the opposite side of the zig zagged stitching and begin unravelling! You can go as long or as short as you wish. For the Lizzie Bennet pom poms, I didn't unravel that much. I wanted LONG puffs for the pollen pom poms. For this strip, I alternated between a pin and a seam ripper. I only removed 2 threads at a time as any more and they began to break in the fabric. (The above picture was taken wile I am blogging now as I forgot to get a picture of the unravelling...)

You can see some of the threads above have gone all weird and spastic, so I used a hair comb to straighten them out.
3. When you get to where you like your fray length, look at the remaining intact, unfrayed fabric. On mine, I had about a 1/2" too much remaining, so I re-zigzagged the bottom and cut off the remainder.
4. Sew a gathering stitch along the bottom between the fray and the zigzag. Gather until it's tight-ish. You will then take one end and start wrapping it around itself. Sort of like wrapping a piece of paper around itself to form a straw, but tighter.

5. When you have the puff wrapped around itself, use the gathering stitch threads and wrap those around the base as tightly as you can without breaking the threads. You will cry if you break your threads. Knot the threads off. Next, take a needle and doubled thread and really snug up the puff, you want it to be tightly compacted. You can see above that the snugging thread is right at the base of the frayed bits. This is important for the next step to be successful. Knot off the thread.

6. This step is very precarious. Because the bottom of the puff is bulky and just weird, you want to cut it off. Sooooooo....being very, very careful not to cut the snugging thread, cut off the base of the puff...the part that is zigzagged.

7. You are almost done with your pom poms!!! Generously apply glue (I used Aleene's Original Tacky Glue) to the end of the puff. This step has a two fold job...it makes sure that you won't have lots of little pieces of fray escaping your puff and it connects the puff to the rest of the pom pom.
8. Adhere the puff to the center of the pom pom and Voila!!!!! Your pom pom is complete! Allow to dry, then attach to your shoes via shoe clips, safety pins or glue...American Duchess has some shoe clip hardware that I am positive would work beautifully!!

Huzzah and away!!! Fun Pollen Puff Pom Poms!!! I ADORE these! They are fun to look at and the puffs are fun to pet! Hahahahahahaha!!! I'm not even kidding you...
If you use this tutorial, I would LOVE to see what you create!!
Be blessed my friends!
g


