
Lace insertion! I adore the look of antique garments with those lovely lacy inserts. So delicate and fine. So feminine and sweet. I had always wondered HOW they did that! I even tried to make a blouse using the quilting method. You know, piecing it together. I think I threw it away out of frustration! Well, I wanted to make a set of Edwardian underwear and of course all the examples that I found in my research had that cursed insertion lace!!!! ACK!!! I was soooooooooo NOT going to attempt to piece a combination and princess petticoat! I like my hair the shade of red that it is currently and don't with to add anymore gray to it. It would then turn pink.
One day while just perusing the web, doing my geeky Victorian/Edwardian/1920s research, I came across instructions for lace insertion...on a blog that I absolutely love and follow anyway!! Huzzah!!! It is the "Wearing History" blog.
http://wearinghistoryblog.com/2012/04/tutorials-basic-lace-insertion-by-machine/#more-3929
The lady who is the blogger, pattern maker, milliner, clothing maker is so delightful! Her name is Lauren and watching her create is so fun! Lauren demonstrated how easily one could employ her lace insertion techniques!!! So, so, so incredibly easy!!!
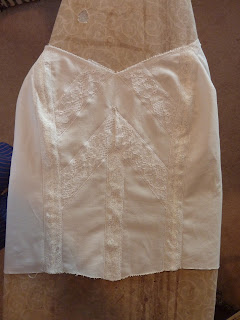
Here is my first attempt ever at lace insertion!! I will most definitely be doing this again! Like in a couple of days....


Voila!! My completed insertion lace! I am so thrilled with it! It actually worked! Ha!!! Next up...trimming out the sleeves and neckline!!
Thank you Lauren!!!
One day while just perusing the web, doing my geeky Victorian/Edwardian/1920s research, I came across instructions for lace insertion...on a blog that I absolutely love and follow anyway!! Huzzah!!! It is the "Wearing History" blog.
http://wearinghistoryblog.com/2012/04/tutorials-basic-lace-insertion-by-machine/#more-3929
The lady who is the blogger, pattern maker, milliner, clothing maker is so delightful! Her name is Lauren and watching her create is so fun! Lauren demonstrated how easily one could employ her lace insertion techniques!!! So, so, so incredibly easy!!!
Here is my first attempt ever at lace insertion!! I will most definitely be doing this again! Like in a couple of days....

Lace pinned in the design that I thought would be cool.

Being very careful, I used the smallest zigzag stitched and stitched the very edge of both sides of the lace to the bodice.

Image of the underside of the bodice to give you a view of how much zigzagging was done.

After the zigzag was complete, flipped the bodice over and vvveeerrryyy carefully cut up the center of the cotton, and ironed the edges away from the lace and right up against the lace, zigzagged again.

I have a pair of small surgical scissors that I used to cut away the excess cotton, being very careful again to not nick the zigzagging.

Voila!! My completed insertion lace! I am so thrilled with it! It actually worked! Ha!!! Next up...trimming out the sleeves and neckline!!
Thank you Lauren!!!
No comments:
Post a Comment